
Medical FAQ
Any retinograph that allows acquiring images complying with the characteristics defined in the chapter "Image mode characteristics" should be compatible with quantusGL®.
It is important that the retinograph allows image storage either in an external memory or that it is connected to an external image storage system.
No, quantusGL is designed to work only with images in PNG or JPEG format.
To extract the image you will need that the retinograph is connected to an internal network, that the retinograph has USB output, or that it has CD/DVD output.
Since each retinograph is different, here are some generic steps to follow to extract the file in JPG or PNG format:
- 1. If the copy cannot be made directly by the internal network, you must insert the storage device (USB or CD/DVD).
- 2. Then you must select the images you want to export and click on the button or tab, to copy or export the images.
- 3. Make sure that the format in which the images are saved is JPEG or PNG. Sometimes you may need to specify the destination drive (network/usb/cd/dvd).
- 4. Once the images have been successfully copied you must remove the storage device.
If you have any doubts about extracting the images, we recommend that you contact your retinograph's technical service, who will be able to help you with this task.
Generally retinographs should have this option. However, in some cases they have it disabled, so you should contact the technical service as they are the only ones who can activate it.
Once you have extracted the images you will have them stored in a folder in the internal network, in a USB device or in a CD or DVD. What you have to do is:
- 1. Connect the USB or insert the CD/DVD in the computer you are going to use. Remember that you must have Internet access from that computer.
- 2. Log in to your quantusGL user account from the computer.
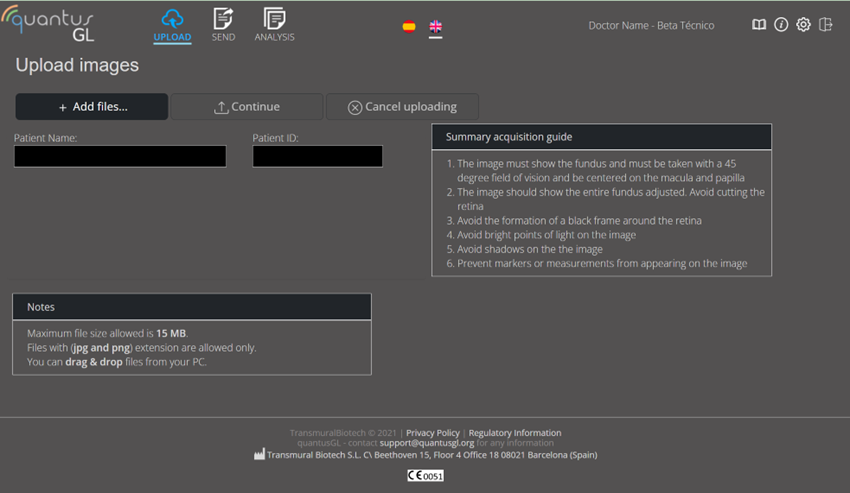
- 3. Click on the Upload Image tab and the UPLOAD window will appear.
- 4. In this window you must click on the +Add files button, and you will be shown another browser window from which you must locate the folder where you saved the images (folder of the internal network, the location of the USB device or the CD).
- 5. Once you have located the folder where the images are located, you can select all of them and click on the Open button. Enter the patient data and click on the Continue button. The images will be loaded into the application so that you can continue with the sending process.
Don't worry, there are other means through which you can extract the images, such as CD/DVD, or the internal network in case you are connected to the hospital network.
For the correct functioning of the system, the image must meet the following requirements:
- 45 degree field of view centered on macula and papilla.
- The image must show the entire fundus of the eye adjusted. The retina must not be cut off.
- The formation of a black frame around the retina should be avoided.
- Avoid bright points of light on the image
- Avoid shadows on the image
- Avoid markers or measurements on the image.
- The image should not be treated with any filter or processing of any kind.
- It is recommended not to use an image resolution lower than 1Mpx.
- The system accepts all image sizes, but will resize them to 1200x1200 px. Therefore, it is recommended to adjust to that size as much as possible.
Access the website of quantusGL and follow the next steps:
First press the ACCESS button in the upper right corner
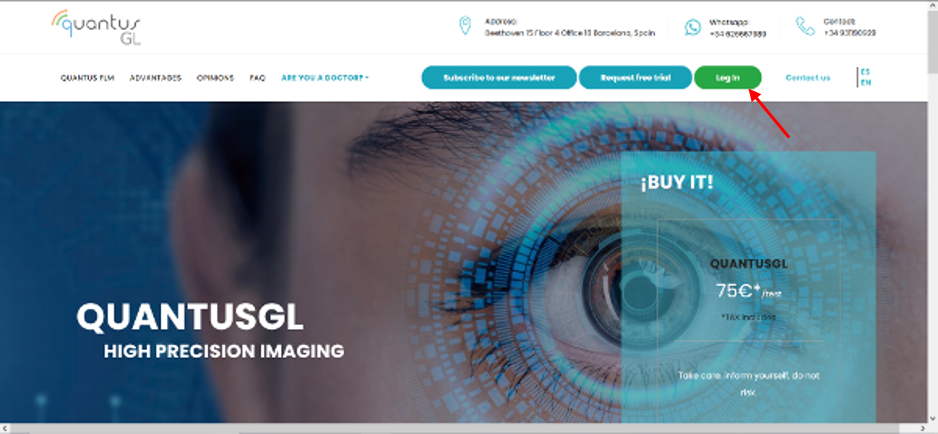
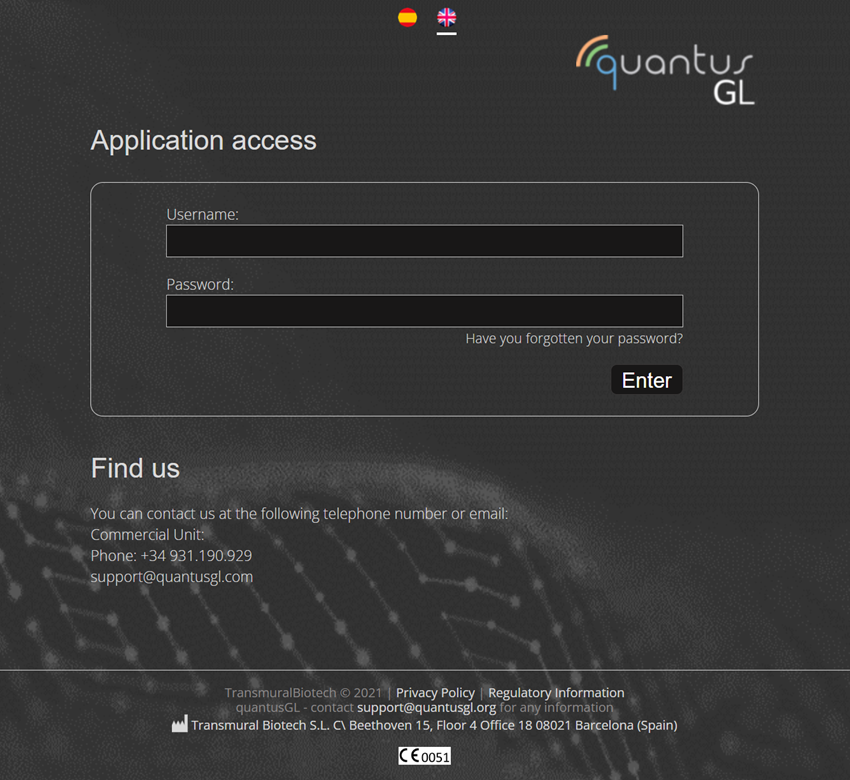
Then enter your account details and press the ENTER button. If you do not have this access data, please contact quantusGL customer service using the email address support@quantusgl.org or by pressing on the Leave a Message tab
It may be the case that when you try to access the application, the following messages are displayed in red
Incorrect username / password. Please try again
Make sure you have entered your username and password properly. Remember that there can be no blank space after the username.
If you are sure that you have entered your username correctly, then the problem may be with your password. If you want, you can generate a new one by following the steps indicated in the next article.
If you still have problems with access, please contact quantusGL customer service using the email address support@quantusgl.org indicating the name of the hospital, clinic or office for which you work.
You must contact customer service using the email address: support@quantusgl.org indicating the name of the center for which you work .
1. Access the website of quantusGL. Click on the blue "Access" button
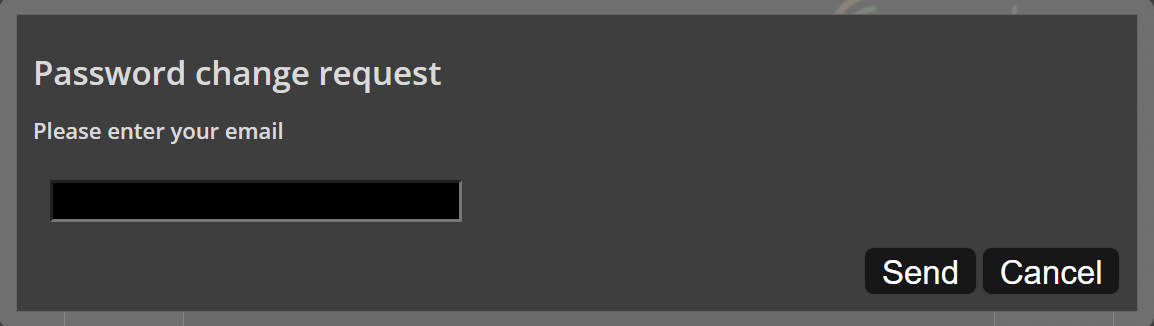
2. Click on the link "You have forgotten your password" and enter your email. If the email is registered in the system, you will receive an email.
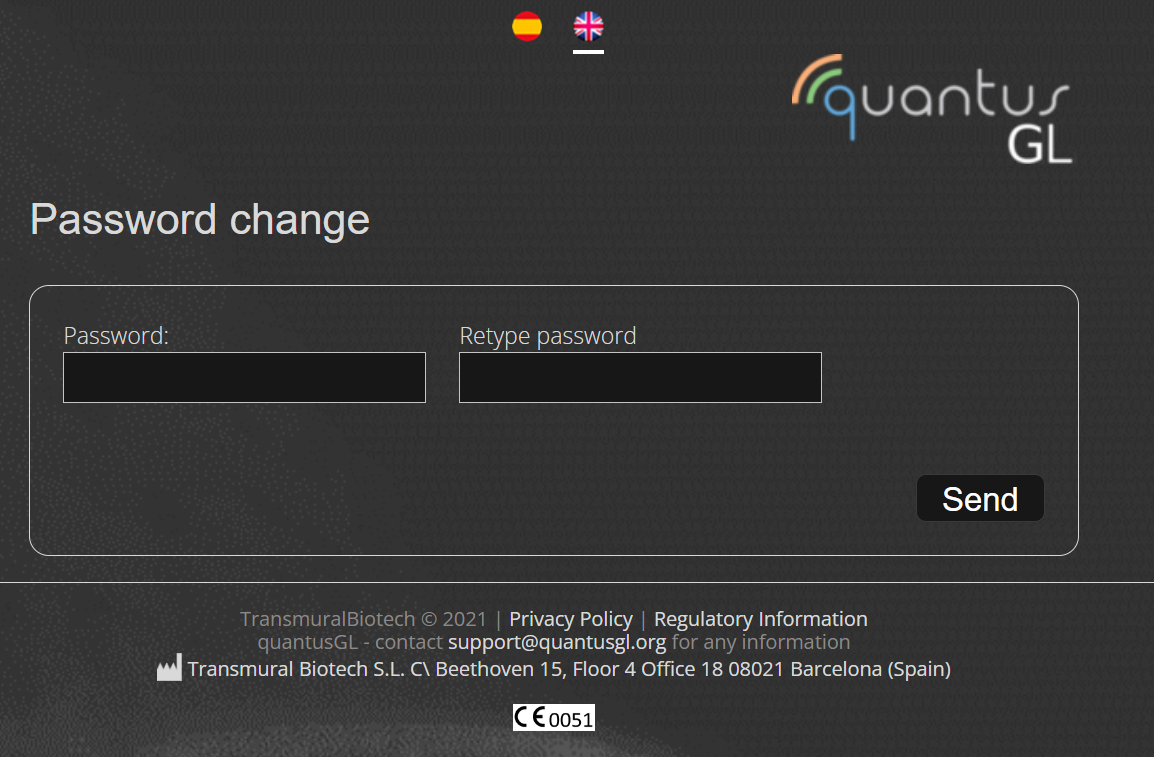
3. Go to your email account and open the email with the subject "Request to change password"
4. Click on the link in the email and in the form that appears, enter a new password twice and click the Send button. Remember that it must be at least 8 characters long.
The error is displayed next to the images (see image below) that have not been uploaded correctly. This may be due to:
- It is not a JPEG or PNG file
- It is not an image; for example, it's a video
- Upload error
If there has been an error in the upload and you have verified that the image is in the correct format, try uploading again and if the problem persists contact us via email at support@quantusgl.org
quantusGL is not able to automatically detect if the acquired image is correct, it is the user's responsibility to use the application correctly, for more information on image acquisition please consult the acquisition guide available in the web application.
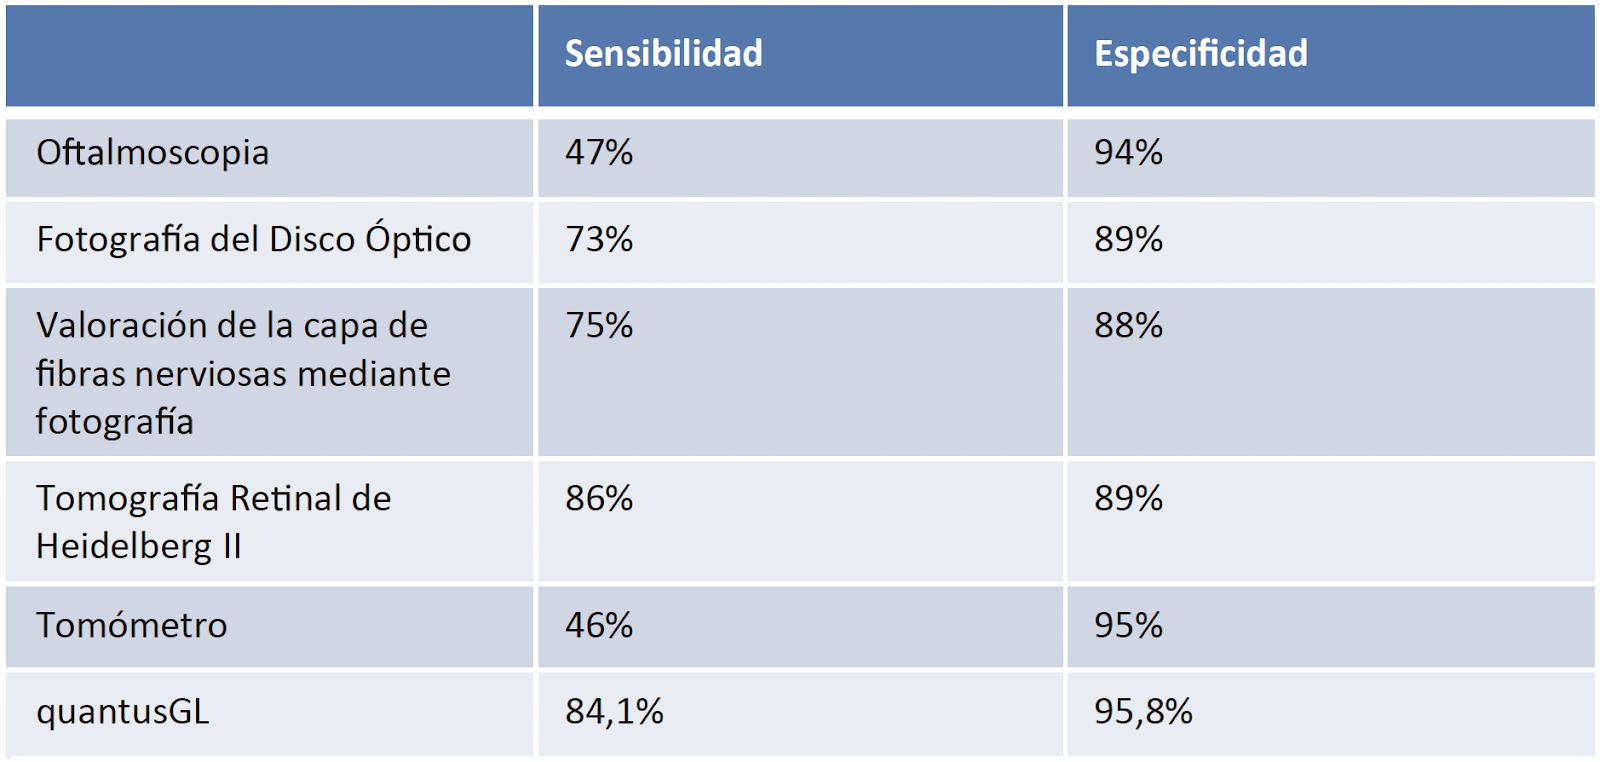
Please note that the result should be used as complementary information to other tests in order to make a clinical decision; the result alone does not provide sufficient information to diagnose and make decisions about the patient.
The following table shows the performance range of quantusGL®:
To consult your report, once you have received the notification email, you can do two things:
1. Click on the link in the email that will allow you to directly consult the result report (you will only be able to consult it 2 times or within 48 hours after receiving the email).
2. Log in to your quantusGL account and go to the results tab, then search for the specific analysis and in the PDF column you will have the report available.
To log in to your Doctor's account, go to www.quantusGL.org, click on the blue "Login" button and enter your credentials to access the application.
In case you have forgotten any login details, read the following articles: if you do not remember your username or this one if you do not remember your password.
First log in with your standard user account and follow the steps indicated in the following images.
1. Click on the Upload Image tab, and then on the add image button.

2. Fill in the patient's data.
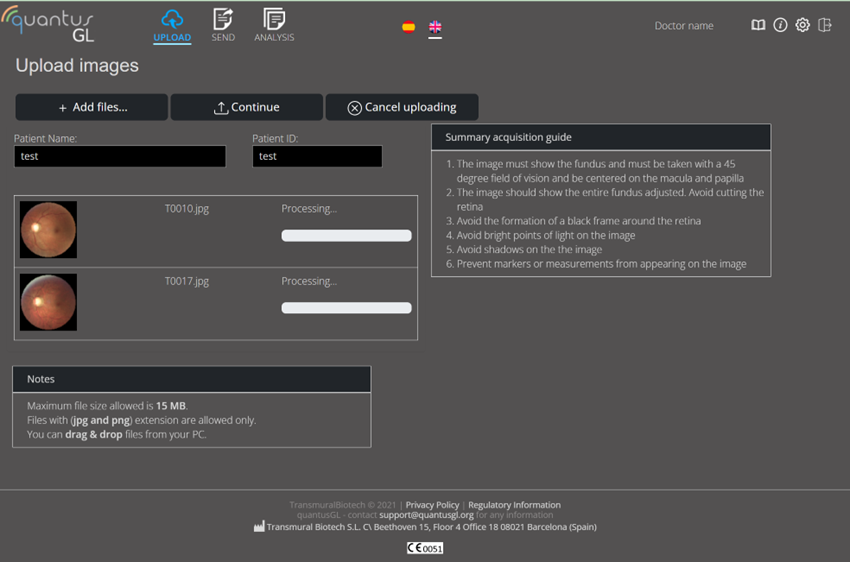
3. Click on the Continue button and close the dialog box that is displayed.
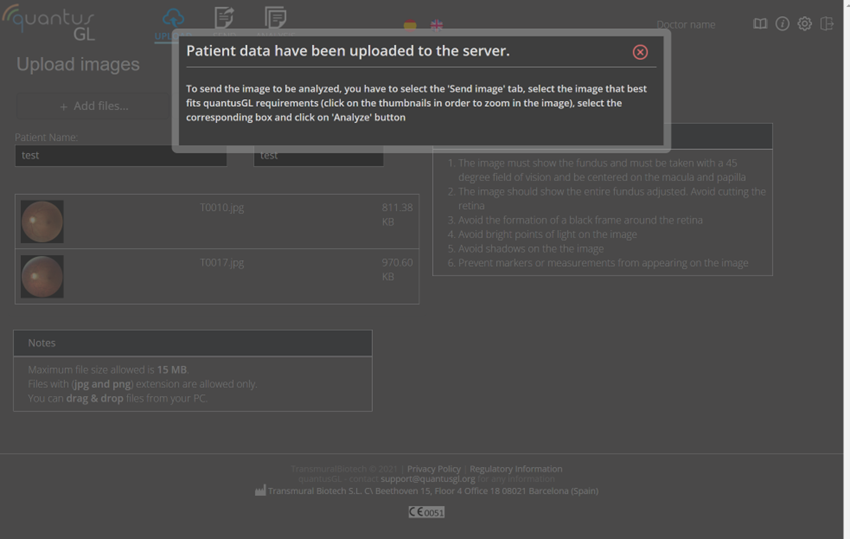
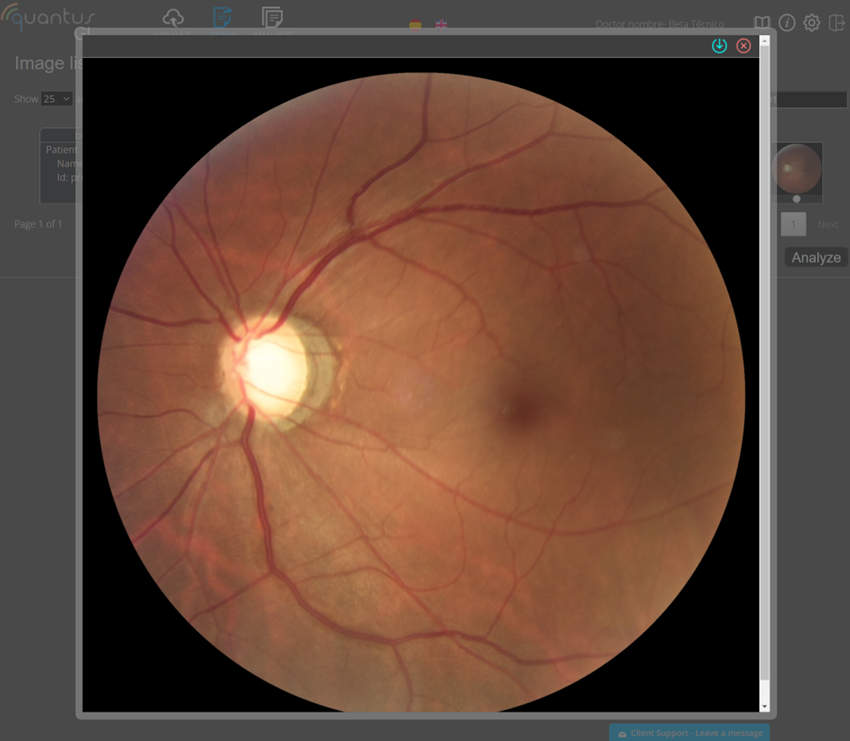
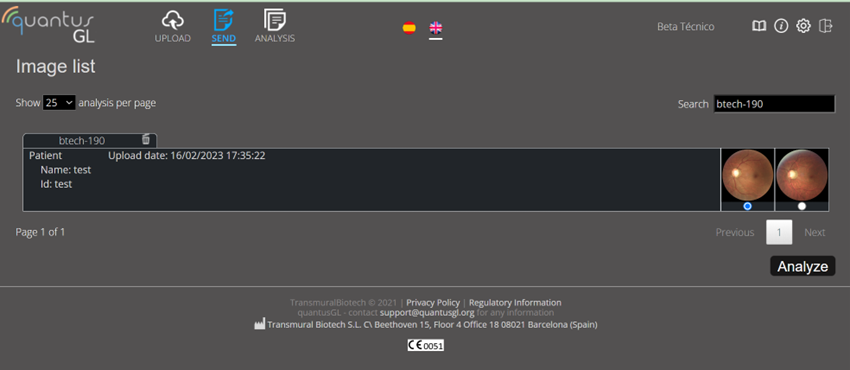
4. To find out which image to select, click on the thumbnail of each line to see which one best suits the quantusGL requirements.
5. Once you know which image to select, click on the button in the Analyze column and finally on the blue Analyze button.
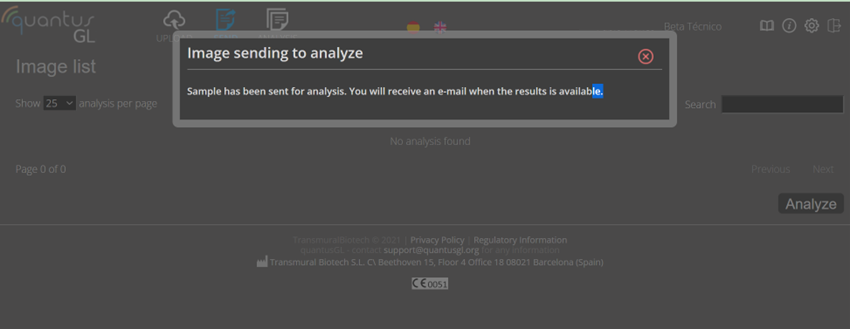
6. The sample has been sent for analysis


Contacto
-
- Dirección
- Calle Juan Ignacio Luca de Tena 12, 28027 Madrid
-
- Teléfonos
-
- info@transmuralbiotech.com
-
- Este producto está disponible
- 24 horas del día
CONDICIONES DE USO
INFORMACIÓN LEGAL Y ACEPTACIÓN
Los términos y condiciones recogidos en el presente Aviso Legal regulan el uso del sitio Web www.quantusgl.org (en adelante, el "Sitio Web") que TRANSMURAL BIOTECH S.L. (en adelante, “TRANSMURAL BIOTECH”) pone a disposición de los usuarios que accedan a su Sitio Web (en adelante, el “Usuario” o “Usuarios”) con la finalidad de proporcionarles información sobre sus servicios de pruebas médicas, así como la posibilidad de hacer uso de los mismos (en adelante, los “Servicios”).
TRANSMURAL BIOTECH S.L., con CIF número B-65084675, tiene su domicilio social en Calle Juan Ignacio Luca de Tena 12 28027-Madrid, España, y está inscrita en el Registro Mercantil de Madrid, al Tomo 46.388, Folio 1, Hoja M-814737, Inscripción 1ª y 2ª. Si desea contactar con TRANSMURAL BIOTECH puede hacer uso del correo electrónico en la dirección info@transmuralbiotech.com
La utilización del Sitio Web por los Usuarios implica la aceptación de todas las condiciones incluidas en este Aviso Legal y la Política de Privacidad.
La prestación de los Servicios del Sitio Web tendrá una duración limitada al momento en que los Usuarios se encuentren conectados al Sitio Web o a alguno de los Servicios que a través del mismo se facilitan. Por tanto, los Usuarios deben leer atentamente el Aviso Legal presente en el Sitio Web en cada una de las ocasiones en que se propongan utilizar el mismo, ya que éste puede sufrir modificaciones sin previo aviso.
TRANSMURAL BIOTECH le informa que los Servicios Asistenciales ofrecidos a través del Sitio Web están sometidos a los Términos de Contratación que el Usuario, antes de la compra, debe aceptar. Los Términos de Contratación, sustituyen, completan y/o modifican en su caso las presentes Condiciones de Uso.
El acceso a y/o la utilización de dichos Servicios y Contenidos (según se define en la Cláusula 7 de éste Aviso Legal), expresa la entera e incondicional aceptación de las condiciones particulares en la versión publicada por TRANSMURAL BIOTECH en el momento en que se produzca dicho acceso y/o utilización.
Es posible que, a lo largo de la prestación de los Servicios incluidos en el Sitio Web, se modifique el nombre del dominio bajo el cual dichos Servicios se prestan. Por lo tanto, los Usuarios conocen y aceptan esta posibilidad, permaneciendo en tal caso, completamente vigentes las obligaciones aceptadas por los Usuarios y TRANSMURAL BIOTECH en función de lo establecido en este documento.
El uso que Usted efectúe del Sitio Web y sus Contenidos y Servicios es totalmente voluntario y queda bajo su entera responsabilidad.
CONDICIONES DE USO DE LOS CONTENIDOS Y SERVICIOS
El acceso al Sitio Web es gratuito salvo en lo relativo al coste de la conexión a través de la red de telecomunicaciones suministrada por el proveedor de acceso contratado por el Usuario. Determinados Servicios son exclusivos para determinados Usuarios y su acceso se encuentra restringido.
Los Usuarios no podrán en ningún caso modificar o suprimir los datos identificativos que existan en su caso de los derechos de TRANSMURAL BIOTECH o de terceros. Los Usuarios únicamente podrán acceder a los Contenidos y Servicios mediante los medios o procedimientos que se hayan puesto a su disposición a este efecto en el Sitio Web o se utilicen habitualmente en Internet para ese fin, siempre que no impliquen la violación de derechos de propiedad intelectual o industrial o impliquen algún tipo de daño para el Sitio Web y/o su información o Contenidos y/o Servicios ofrecidos.
Los Usuarios se obligan a usar los Contenidos y Servicios de forma diligente, legal, correcta y lícita y, en particular, se compromete a título meramente enunciativo y no exhaustivo a abstenerse de:
1. utilizar los Contenidos y Servicios de forma y con fines contrarios a la ley, a la moral y a las buenas costumbres generalmente aceptadas o al orden público;
2. utilizar los Contenidos y Servicios de forma que produzcan o puedan producir efectos contrarios a la ley, a la moral y a las buenas costumbres generalmente aceptadas o al orden público;
3. transmitir o difundir información, datos, contenidos, mensajes, gráficos, dibujos, archivos de sonido y/o imagen, fotografías, grabaciones, software, y en general, cualquier material obsceno, ofensivo, vulgar o que induzca actuaciones delictivas, denigratorias, difamatorias, infamantes, violentas o, en general, contrarias a la ley, a la moral y buenas costumbres generalmente aceptadas o al orden público;
4. reproducir, copiar, o distribuir los Contenidos, así como permitir el acceso del público a los mismos a través de cualquier modalidad de comunicación pública, o transformarlos o modificarlos, a menos que se cuente con la autorización del titular de los correspondientes derechos o ello resulte legalmente permitido;
5. vulnerar derechos de propiedad intelectual o industrial pertenecientes a TRANSMURAL BIOTECH o a terceros;
6. utilizar los Servicios y Contenidos de manera que pueda suponer un perjuicio o sobrecarga para el funcionamiento del Sitio Web;
7. realizar transacciones fraudulentas o que puedan facilitar conductas ilícitas o fraudulentas de cualquier tipo;
8. emplear los Contenidos y Servicios y, en particular, la información de cualquier clase obtenida a través del Sitio Web con cualquier tipo de finalidad publicitaria y, en especial, para remitir publicidad, comunicaciones con fines de venta directa o con cualquier otra clase de finalidad comercial, mensajes no solicitados individualizados o dirigidos a una pluralidad de personas, así como de comercializar o divulgar de cualquier modo dicha información.
Los Usuarios responderán por los daños y perjuicios de toda naturaleza que TRANSMURAL BIOTECH pueda sufrir, directa o indirectamente, como consecuencia del incumplimiento de cualquiera de las obligaciones derivadas de este Aviso Legal o de la ley en relación con la utilización del Sitio Web y los Contenidos y/o Servicios.
El Contenido disponible en el Sitio Web se proporciona en el entendimiento de que TRANSMURAL BIOTECH no se dedica a prestar asesoramiento médico, terapéutico ni ningún otro tipo de Servicio o asesoramiento profesional. Dichos Contenidos se proporcionan exclusivamente como ayuda general con fines instructivos y no deberá considerarse como asesoramiento médico o sanitario ni utilizarse para diagnosticar o tratar problemas específicos. Los Contenidos tampoco pretenden sustituir el asesoramiento o los servicios profesionales de un facultativo que esté familiarizado con las circunstancias específicas del Usuario. Consulte siempre a su médico o compañía médica en relación con cualquier enfermedad y antes de someterse a cualquier nuevo tratamiento.
EXCLUSIÓN DE GARANTÍAS Y DE RESPONSABILIDAD
TRANSMURAL BIOTECH se reserva el derecho a interrumpir el acceso al Sitio Web, así como la prestación de cualquiera o de todos los Contenidos y/o Servicios que se prestan a través del mismo en cualquier momento y sin previo aviso, ya sea por motivos técnicos, de seguridad, de control, de mantenimiento, por fallos de suministro eléctrico o por cualquier otra causa fundada.
En consecuencia, TRANSMURAL BIOTECH no garantiza la fiabilidad, la disponibilidad ni la continuidad del Sitio Web ni de los Contenidos y/o Servicios, por lo que la utilización de los mismos por parte de los Usuarios se lleva a cabo por su propia cuenta y riesgo, sin que, en ningún momento puedan exigirse responsabilidades por la discontinuidad o falta de disponibilidad de los Contenidos y/o sus Servicios.
TRANSMURAL BIOTECH no será responsable en caso de que existan interrupciones del Servicio, demoras, errores, mal funcionamiento del mismo y, en general, demás inconvenientes que tengan su origen en causas que escapan del control de TRANSMURAL BIOTECH, y/o debidas a una actuación dolosa o culposa de los Usuarios y/o tengan por origen causas de Fuerza Mayor. Sin perjuicio de lo establecido en el artículo 1105 del Código Civil, se entenderán incluidos en el concepto de Fuerza Mayor, además, y a los efectos de las presentes condiciones generales, todos aquellos acontecimientos acaecidos fuera del control de TRANSMURAL BIOTECH, tales como: fallo de terceros, operadores o compañías de servicios, falta de acceso a redes de terceros, actos u omisiones de las Autoridades Públicas, aquellos otros producidos como consecuencia de fenómenos naturales, apagones, etc. y el ataque de hackers, crackers u otros terceros a la seguridad o integridad del sistema informático. En cualquier caso, sea cual fuere su causa, TRANSMURAL BIOTECH no asumirá responsabilidad alguna ya sea por daños directos o indirectos, daño emergente y/o por lucro cesante.
TRANSMURAL BIOTECH excluye cualquier responsabilidad por los daños y perjuicios de toda naturaleza que puedan deberse a la falta de veracidad, exactitud, exhaustividad y/o actualidad de los Contenidos transmitidos, difundidos, almacenados, puestos a disposición o recibidos, obtenidos o a los que se haya accedido a través del Sitio Web, ni tampoco por los contenidos prestados u ofertados por terceras personas o entidades. TRANSMURAL BIOTECH tratará en la medida de lo posible de actualizar y rectificar aquella información alojada en el Sitio Web que no cumpla con las mínimas garantías de veracidad. No obstante quedará exonerada de responsabilidad por su no actualización o rectificación así como por los Contenidos e informaciones vertidos en la misma.
TRANSMURAL BIOTECH no se responsabiliza por el Contenido de la información recogida en el Sitio Web, así como por aquellas opiniones, comentarios, apreciaciones o cualquier otra manifestación recogida en el mismo que no sean emitidas directamente por TRANSMURAL BIOTECH.
TRANSMURAL BIOTECH excluye cualquier responsabilidad por los daños y perjuicios de toda clase que puedan deberse a la presencia de virus o a la presencia de otros elementos lesivos en los Contenidos que puedan producir alteración en los sistemas informáticos, así como en los documentos o sistemas almacenados en los mismos.
TRANSMURAL BIOTECH no se hace responsable de los Contenidos, cualesquiera que sean los mismos, que los Usuarios envíen a TRANSMURAL BIOTECH por medio del Sitio Web, por medio del servicio de correo electrónico o por cualquier otro medio, siendo por tanto imputable a los Usuarios cualquier responsabilidad dimanante de los Contenidos enviados por los mismos.
TRANSMURAL BIOTECH no se hace responsable por la utilización que los Usuarios realicen de los Contenidos del Sitio Web, así como de cualquier otro material contenido en el Sitio Web, que pueda suponer una violación de cualquier tipo de norma, nacional o internacional, de los derechos de propiedad intelectual o industrial o cualquier otro derecho de terceros. De igual forma, no se hace responsable de los posibles errores de seguridad que se pudieran producir por el hecho de utilizar versiones de navegadores no actualizadas, o de las consecuencias que se pudieran derivar del mal funcionamiento del navegador, ya sea por configuración inadecuada, presencia de virus informáticos o cualquier otra causa ajena a TRANSMURAL BIOTECH.
TRANSMURAL BIOTECH garantiza que tiene suscritos acuerdos con los Centros o Profesionales Médicos que conforman el Cuadro Médico para prestar el servicio de atención médica al Usuario. TRANSMURAL BIOTECH no será responsable de los retrasos, cumplimientos defectuosos o incumplimientos en la prestación del Servicio Médico cuando los mismos se debieran al incumplimiento del Centro o Profesional Médico. En particular, en relación con la actividad profesional médica propiamente dicha, los diagnósticos y tratamientos a los Usuarios, TRANSMURAL BIOTECH será totalmente ajeno y carecerá de responsabilidad alguna. El Centro o Profesional Médico será, por tanto, el único responsable de cualquier obligación, derecho o resultado derivados de la prestación de sus servicios.
ENLACES A TERCEROS (ENLACES SALIENTES)
El servicio de acceso al Sitio Web puede incluir dispositivos técnicos de enlace, directorios e incluso instrumentos de búsqueda que permiten a los Usuarios acceder a sitios web de Internet (en adelante, "Sitios Enlazados"). En estos casos, TRANSMURAL BIOTECH actúa como prestador de servicios de conformidad con el artículo 17 de la Ley 34/2002, de 11 de julio, de Servicios de la Sociedad de la Información y el Comercio Electrónico (en adelante, la “LSSI”) y sólo será responsable de los contenidos y servicios suministrados en los Sitios Enlazados en la medida en que tenga conocimiento efectivo de la ilicitud o de que puedan lesionarse bienes o derechos de terceros y no haya desactivado el enlace con la diligencia debida.
En el supuesto de que los Usuarios consideren que existe un Sitio Enlazado con contenidos ilícitos o inadecuados podrán comunicárselo a TRANSMURAL BIOTECH a la dirección de contacto señalada en el primer apartado de este Aviso Legal, indicando:
1. del comunicante: nombre, dirección, número de teléfono y dirección de correo electrónico;
2. una descripción de los hechos que revelan el carácter ilícito o inadecuado del Sitio Enlazado;
3. una declaración expresa de que la información contenida en la comunicación es exacta. En ningún caso esta comunicación conlleva la obligación de retirar el correspondiente enlace, ni supone, según lo dispuesto en la LSSI, el conocimiento efectivo de las actividades y/o contenidos indicados por el comunicante.
En ningún caso, la existencia de Sitios Enlazados debe presuponer la existencia de acuerdos con los responsables o titulares de los mismos, ni la recomendación, promoción o identificación de TRANSMURAL BIOTECH con las manifestaciones, contenidos o servicios proveídos.
TRANSMURAL BIOTECH no conoce los contenidos y servicios de los Sitios Enlazados y por tanto no se hace responsable por los daños producidos por la ilicitud, calidad, desactualización, indisponibilidad, error e inutilidad de los contenidos y/o servicios de los Sitios Enlazados ni por cualquier otro daño que no sea directamente imputable a TRANSMURAL BIOTECH, salvo en lo previsto en el mencionado artículo 17 de la LSSI.
Si los Usuarios deciden visitar y/o utilizar cualquiera los Sitios Enlazados, lo harán por su cuenta y riesgo, y tendrán que tomar las medidas de protección oportunas contra virus u otros elementos dañinos.
ENLACES AL SITIO WEB (ENLACES ENTRANTES)
El usuario de Internet que quiera introducir enlaces desde sus propias páginas web al Sitio Web deberá cumplir con las condiciones que se detallan a continuación sin que el desconocimiento de las mismas evite las responsabilidades derivadas de la ley:
1. El enlace únicamente vinculará con la home page o página principal del Sitio Web pero no podrá reproducirla de ninguna forma (inline links, deep-links, browser o border enviroment, copia de los textos, gráficos, etc.);
2. Quedará en todo caso prohibido, de acuerdo con la legislación aplicable y vigente en cada momento, establecer frames o marcos de cualquier tipo que envuelvan al Sitio Web o permitan la visualización de los Contenidos a través de direcciones de Internet distintas a las del Sitio Web y, en cualquier caso, cuando se visualicen conjuntamente con contenidos ajenos al Sitio Web de forma que: (i) produzca, o pueda producir, error, confusión o engaño en los Usuarios sobre la verdadera procedencia del Servicio o Contenidos; (ii) suponga un acto de comparación o imitación desleal; (iii) sirva para aprovechar la reputación de la marca y prestigio de TRANSMURAL BIOTECH; o (iv) de cualquier otra forma resulte prohibido por la legislación vigente;
3. No se realizarán desde la página web que introduce el enlace ningún tipo de manifestación o indicación falsa, inexacta o incorrecta sobre TRANSMURAL BIOTECH, empleados, clientes o sobre la calidad de los Servicios que presta;
4. En ningún caso, se expresará ni se dará a entender en la página web donde se ubique el enlace que TRANSMURAL BIOTECH ha prestado su consentimiento para la inserción del enlace o que de otra forma patrocina, colabora, verifica o supervisa los servicios del remitente;
5. Está prohibida la utilización de cualquier marca denominativa, gráfica o mixta o cualquier otro signo distintivo de TRANSMURAL BIOTECH dentro de la página web del remitente salvo en los casos permitidos por la ley o expresamente autorizados por TRANSMURAL BIOTECH y siempre que se permita, en estos casos, un enlace directo con el Sitio Web en la forma establecida en esta cláusula;
6. La página web que establezca el enlace deberá cumplir fielmente con la ley y no podrá en ningún caso disponer o enlazar con contenidos propios o de terceros que:
1. sean ilícitos, nocivos o contrarios a la moral y a las buenas costumbres (pornográficos, violentos, racistas, etc.);
2. induzcan o puedan inducir en el Usuario la falsa concepción de que TRANSMURAL BIOTECH suscribe, respalda, se adhiere o de cualquier manera apoya las ideas, manifestaciones o expresiones, lícitas o ilícitas, del remitente;
3. resulten inapropiados o no pertinentes con la actividad de TRANSMURAL BIOTECH en atención al lugar, contenidos y temática de la página web del remitente;
El establecimiento del enlace no implica en ningún caso la existencia de relaciones entre TRANSMURAL BIOTECH, y el propietario de la página web en la que se establezca, ni la aceptación y aprobación por parte de TRANSMURAL BIOTECH de sus contenidos o servicios allí ofrecidos puestos a disposición del público.
TRANSMURAL BIOTECH podrá solicitar, en cualquier momento y sin necesidad de aportar las razones de dicha solicitud, que se elimine cualquier enlace al Sitio Web, después de lo cual el responsable de la página web enlazante deberá proceder de inmediato a su eliminación.
PROPIEDAD INTELECTUAL E INDUSTRIAL
La totalidad de los Contenidos del Sitio Web, entendiendo por éstos a título meramente enunciativo los textos, fotografías, gráficos, imágenes, iconos, tecnología, software, links, dominios, marcas y demás contenidos audiovisuales o sonoros, así como su diseño gráfico y códigos fuente, son de la exclusiva propiedad de TRANSMURAL BIOTECH o de terceros, cuyos derechos en su caso reconoce TRANSMURAL BIOTECH, y están sujetos a derechos de propiedad intelectual e industrial protegidos por la legislación nacional e internacional (en adelante, los “Contenidos”).
Queda estrictamente prohibido cualquier utilización de cualquiera de los elementos objeto de propiedad industrial e intelectual con cualquier tipo de finalidad, en especial comercial, así como su distribución, comunicación pública, modificación, alteración, transformación o descompilación, salvo autorización expresa por escrito por parte del titular de los mismos.
La infracción de cualquiera de los citados derechos puede constituir una vulneración de las presentes disposiciones, así como una acción constitutiva de delito tipificada en los artículos 270 y siguientes del Código Penal.
TÉRMINOS DE CONTRATACIÓN
Última modificación: 16 de enero de 2019
TÉRMINOS CONTRATACIÓN GENERALES
INFORMACIÓN GENERAL
TRANSMURAL BIOTECH S.L. (en adelante, “TRANSMURAL”), con CIF número B-65084675, con domicilio social en C/ Juan Ignacio Luca de Tena 12 28027 Madrid, e inscrita en el Registro Mercantil de Madrid, al Tomo 46.388, Folio 1, Hoja M-814737, Inscripción 1ª y 2ª es el titular del sitio web https://www.quantusgl.org (en adelante, el “Sitio Web”).
Los Términos de Contratación están disponibles para todos los usuarios de la página web en el enlace Términos de Contratación situados en el pie de la página web de manera libre y gratuita.
Si el Cliente desea contactar con TRANSMURAL para cualquier duda o incidencia con su compra, puede utilizar el número de teléfono +34 931190229, en horario de 09:00 a 18:00 de Lunes a Viernes (hora España), o si lo prefiere a través del correo electrónico en la dirección info@transmuralbiotech.com
CONTRATACIÓN ELECTRÓNICA
El contrato entre TRANSMURAL y el Cliente se entiende perfeccionado desde el mismo momento en que éste finalice el procedimiento de contratación presionando el botón “Comprar”, entendiéndose que el seguimiento de todas las fases del procedimiento de contratación electrónica y la inclusión de todos los datos solicitados suponen, junto con la marcación de la casilla correspondiente relativa a la aceptación de los presentes Términos de Contratación y los términos de la Condiciones Particulares correspondientes, una manifestación directa de la voluntad del Cliente de aceptar los mismos.
El idioma en que se tramitará el procedimiento de contratación y en el que se formaliza el presente contrato será, salvo indicación en contrario, el castellano.
MODIFICACIÓN DE LOS TÉRMINOS DE CONTRATACIÓN
TRANSMURAL se reserva el derecho a modificar unilateralmente los presentes Términos de Contratación en cualquier momento. Todas las modificaciones de los Términos de Contratación se publicarán en el Sitio Web. El Cliente estará sujeto a aquella versión del presente documento que aceptó en el momento de compra.
La fecha desde la cual los presentes Términos de Contratación están vigentes es la recogida al inicio del documento.
PROCESO DE COMPRA ONLINE
El procedimiento de contratación de los productos ofrecidos se lleva a cabo de forma electrónica a través del Sitio Web. El procedimiento completo que deberán seguir todos los Usuarios que deseen adquirir alguno de los productos y/o servicios ofrecidos a través del Sitio Web será el siguiente:
Una vez el Usuario haya accedido al Sitio Web, deberá seleccionar aquellos productos y/o servicios que le interesen, revisar sus descripciones, así como sus características, condiciones, lo que incluye y no incluye y precios finales indicados en la ficha descriptiva de cada producto y/o servicio.
Acto seguido el Usuario deberá leer y aceptar expresamente los presentes Términos de Contratación, así como la Política de Privacidad, mediante la marcación de las casillas correspondientes dispuestas a tal efecto y hacer clic sobre el botón “Comprar ahora”.
El pago se realiza a través del Sistema REDSIS, por lo que el Usuario será redireccionado, automáticamente por el sistema a la plataforma de pago online (TPV) de las entidades bancarias correspondientes.
El Usuario deberá introducir los datos de pago solicitados e finalizar el proceso de compra electrónica, para lo cual únicamente deberá hacer clic sobre el botón “Pagar ahora”.
Finalizada la compra, se mostrará una pantalla resumen de la compra realizada, sin perjuicio de que el Cliente reciba automáticamente un correo electrónico de confirmación de que la compra se ha realizado con éxito.
En dicho correo electrónico se describirá la compra realizada, así como las características de la misma. Este documento servirá de acreditación para cualquier tipo de reclamación. En caso de no recibir dicho correo electrónico, el Cliente deberá revisar su bandeja de “correo no deseado” o “spam” y, si no se encontrase en ese apartado, deberá comunicarlo a TRANSMURAL en el menor tiempo posible para que se pueda solucionar el incidente.
PRECIO Y MODO DE PAGO
Todos los precios mostrados en el Sitio Web son precios finales de los productos y/o servicios, quedando expresamente incluido el Impuesto sobre el Valor Añadido (IVA). Dichos precios serán mostrados en Euros (€). En el caso de que el precio final cambiase debido a incrementos o descuentos que sean de aplicación, gastos repercutidos al Cliente y/o gastos adicionales por productos y/o servicios accesorios, medios de pago, etc., todos estos importes serán mostrados al Cliente de forma desglosada y previa al pago durante el proceso de contratación.
El pago se efectúa a través de tarjeta de crédito o débito y se cargará en la cuenta del Cliente en el momento de realizar la compra. Para proceder al pago, el Cliente deberá seguir todas y cada una de las instrucciones que se indiquen en el momento de la compra, proporcionando la siguiente información: Nombre del titular, tipo de tarjeta, número de tarjeta, fecha de caducidad de la tarjeta o cualquier otra que se exija durante el proceso de compra. El Cliente se compromete a no proporcionar datos falsos, incluyendo nombres, direcciones y/o detalles de contacto o pago, así como a no iniciar alguna actividad ilegal en conexión con la compra y a no permitir que nadie lo haga.
Para efectuar el pago, el Cliente será redireccionado a la plataforma de pago online (TPV) de las entidades bancarias correspondientes, donde podrá pagar con su tarjeta de débito o crédito de manera segura.
TRANSMURAL manifiesta que no tiene acceso ni almacena datos sensibles relativos al medio de pago utilizado por el Cliente. Únicamente la entidad correspondiente procesadora del pago tiene acceso a estos datos a modo de gestión de los pagos y cobros.
Todos los datos proporcionados a estos efectos son encriptados para garantizar la máxima seguridad de los mismos.
DERECHO DE DESISTIMIENTO Y REEMBOLSOS
De acuerdo con lo previsto en la normativa vigente en materia de consumidores y usuarios, el Cliente podrá, sin necesidad de justificar su decisión y sin penalización alguna, ejercer el derecho de desistimiento durante los catorce (14) días naturales siguientes a la fecha de compra, siempre y cuando no haya hecho uso del servicio.
Para ejercer el derecho de desistimiento, el Cliente deberá manifestarlo enviando una comunicación inequívoca a la dirección de correo electrónico de TRANSMURAL indicada en los presentes Términos de Contratación indicando:
- Nombre y apellidos del Cliente;
- Código de autorización;
- Dirección de correo electrónico utilizado para la compra.
TRANSMURAL comunicará por correo electrónico el acuse de recibo del desistimiento del Cliente y efectuará el reembolso del importe del Código en el plazo máximo de catorce (14) días naturales a partir del día de solicitud de desistimiento.
Cualquier reembolso se realizará mediante el mismo medio de pago con el que el Cliente realizó la transacción. En caso de que el medio de pago hubiera sido cancelado, expirado o hubiera dejado de ser válido por cualquier motivo, el Cliente deberá notificarlo a la dirección de correo electrónico info@transmuralbiotech.com. De lo contrario, TRANSMURAL no se responsabiliza del reembolso, por lo que el Cliente deberá ponerse en contacto con su entidad bancaria o proveedor de servicios de pago para tramitar el reembolso.
El reembolso se considerará ejecutado si el Cliente no lo rechaza en el plazo de catorce (14) días naturales desde la fecha de recepción. El ejercicio del derecho de desistimiento extinguirá las obligaciones de TRANSMURAL con el Cliente en relación con el Código y/o el Servicio Asistencial sobre el que haya desistido.
RESPONSABILIDAD SOBRE LOS CONTENIDOS
TRANSMURAL garantiza que los contenidos, datos o informaciones relativos a los productos y/o servicios ofrecidos en su Sitio Web son fiables, veraces y exactos. No obstante, TRANSMURAL no se hará responsable de aquellos contenidos, datos o informaciones, que hubieran sido introducidos, mostrados o modificados por terceros ajenos a TRANSMURAL.
Las fotografías, textos, grafismos, informaciones o demás contenidos y características reproducidos que ilustren los productos y/o servicios comercializados por TRANSMURAL son meramente ilustrativos, por lo que podrán variar. No obstante lo anterior, TRANSMURAL empleará sus mejores esfuerzos para que la descripción de los productos y/o servicios sea lo más ajustada posible a la realidad.
RESPONSABILIDAD SOBRE EL PROCESO DE CONTRATACIÓN
Tanto el Cliente como TRANSMURAL se comprometen a cumplir con sus obligaciones legales y contractuales generadas en virtud del presente contrato.
TRANSMURAL no será responsable en caso de indisponibilidad de los productos y/o servicios ofrecidos a través del Sitio Web cuando ello sea por fuerza mayor, robo o pérdida, o error en el pedido o datos facilitados por el Usuario.
TRANSMURAL empleará todos los esfuerzos a su alcance para mantener disponibles los productos y/o servicios a través del Sitio Web, salvo falta de disponibilidad o de rendimiento del mismo debido a:
Inactividad o indisponibilidad temporal del Sitio Web debido a actualización y/o mantenimiento técnico del mismo, de lo que se informará previamente, y tan pronto como sea posible, mediante publicación en el propio Sitio Web.
Causas ajenas al control de TRANSMURAL, tales como fuerza mayor, problemas de acceso a Internet, problemas tecnológicos, acciones u omisiones de terceros, etc.
En todos los casos referidos, ajenos al control y la diligencia debida por TRANSMURAL, el Usuario no tendrá derecho a indemnización alguna de TRANSMURAL por daños o perjuicios, directos o indirectos, ni por lucro cesante.
En caso de cierre o suspensión del Sitio Web por causas ajenas a la actuación de TRANSMURAL, y siempre que sea posible, se informará puntualmente al Usuario del traslado del servicio a un nuevo dominio, modificándose únicamente las estipulaciones de los presentes Términos de Contratación en lo relativo al dominio en que el Sitio Web permanece activo.
CONSULTAS O RECLAMACIONES
Si el Cliente utiliza el Código, pero el Proveedor Asistencial no le proporciona adecuadamente el Servicio Asistencial o si tiene alguna queja o comentario respecto a la ejecución del Servicio Asistencial, deberá presentar directamente su reclamación ante el Proveedor Asistencial, no estando legitimada TRANSMURAL para la recepción de ninguna reclamación.
LEY Y JURISDICCIÓN APLICABLE
Salvo disposición contraria de la legislación aplicable, para toda cuestión litigiosa o que incumba al Sitio Web o a la contratación de productos y/o servicios regulada en los presentes Términos de Contratación, será de aplicación la legislación española.
De igual forma, en caso de controversias relativas a la contratación online, le informamos que la Comisión Europea pone a disposición de los consumidores una Plataforma de resolución de reclamaciones online en materia de consumo, a la que podrá acceder a través del siguiente enlace
CONDICIONES PARTICULARES SERVICIO ASISTENCIAL
Los presentes términos y condiciones (en adelante, loas “Términos de Contratación”) regulan el servicio de intermediación por el que TRANSMURAL pone a disposición del Cliente, para su contratación, los productos y/o servicios entregados y/o suministrados por el Proveedor Asistencial al Cliente (en adelante, los “Servicios Asistenciales”) una vez que éste presente el Código de Autorización.
Estas condiciones junto con las descritas en el apartado de Condiciones Generales constituyen el contrato que el Cliente suscribe con TRANSMURAL.
Por “Código” se entenderá, a efectos de los presentes Términos de Contratación, el instrumento electrónico o físico que faculta al titular del mismo (en adelante, el “Cliente”) a recibir el Servicio Asistencial.
El profesional médico o de bienestar es un tercero ajeno que no forma parte de TRANSMURAL y entrega y/o suministra el Servicio Asistencial contratado por el Cliente mediante la entrega del Código (en adelante, el “Proveedor Asistencial”).
El Cliente deberá comprobar antes de la compra que en el listado de Proveedores Asistenciales existe uno a donde puede acudir a realizarse la prueba.
CONDICIONES DE USO DEL CÓDIGO
El Cliente, al comprar el Servicio Asistencial, recibirá por correo electrónico el Código que deberá entregar al Proveedor Asistencial. A continuación, el Cliente deberá llamar al centro médico del Proveedor Asistencial elegido para reservar una cita. El Código da derecho a la prestación del Servicio Asistencial adquirido.
Salvo que se indique lo contrario, el Código:
1. solo se puede canjear una vez;
2. únicamente se puede usar para el servicio contratado.
Por tanto, la compra de un Código se entiende realizada para el uso personal, bien del Cliente, bien de cualquier tercero al que éste designe. Queda expresamente prohibido:
1. La venta o uso con finalidades lucrativas del Código.
2. La copia del Código.
Una vez emitido el Código, el Cliente será el único responsable de su custodia. Ni TRANSMURAL ni el Proveedor Asistencial se responsabilizan de la pérdida o robo del Código. El Código de Autorización se encuentra bajo su la exclusiva responsabilidad del Cliente.
La utilización del Código con finalidades distintas a las previstas en los presentes Términos de Contratación (i) podrá conllevar la anulación del Código, y (ii) eximirá en todo caso a TRANSMURAL de cualquier responsabilidad frente al Cliente y frente al tercero adquirente o cualquier tercero, reservándose asimismo TRANSMURAL cuantas acciones le correspondan en derecho.
Si el Cliente desea contratar pruebas complementarias deberá adquirirlas directamente con el Proveedor Asistencial. Si no hace efectivo el Código dentro del Periodo de Validez, el Código caducará automáticamente y quedará sin efecto, por lo que el Cliente no tendrá derecho a ningún reembolso.
Salvo que el propio Servicio Asistencial lo permita, el Código no da derecho al titular del mismo a recibir el Servicio Asistencial en un determinado momento, por lo que el Cliente deberá acordar con el Proveedor Asistencial el momento de prestación del Servicio Asistencial.
El Código sólo se puede canjear completamente. No se admitirán canjes ni cancelaciones parciales. En caso de que acuerde con el Proveedor Asistencial el canje del Código por un servicio de menor valor del Servicio Asistencial contratado, el Cliente no tendrá derecho a la devolución del dinero sobrante, ni a disponer de crédito o de un nuevo Código por valor equivalente a la diferencia entre el valor original y el valor del Servicio Asistencial disfrutado.
Si el Proveedor Asistencial seleccionado por el Cliente, no pudiera proporcionar el Servicio Asistencial en las condiciones pactadas, TRANSMURAL pondrá a disposición del Cliente el reembolso del precio de compra del Código.
RESPONSABILIDAD SOBRE EL SERVICIO ASISTENCIAL
TRANSMURAL no será responsable en caso de indisponibilidad de los productos y/o servicios ofrecidos a través del Sitio Web cuando ello sea por fuerza mayor, robo o pérdida, o error en el pedido o datos facilitados por el Usuario, así como en caso de errores, acciones u omisiones imputables al Proveedor Asistencial.
TRANSMURAL no será responsable de los retrasos, cumplimientos defectuosos o incumplimientos en la prestación del Servicio Asistencial cuando los mismos se debieran al incumplimiento del Proveedor Asistencial. En particular, en relación con la actividad profesional médica propiamente dicha y los diagnósticos y tratamientos a los Clientes, TRANSMURAL será totalmente ajeno y carecerá de responsabilidad alguna, siendo dicha relación directa entre el Proveedor asistencial y el Cliente. El Proveedor Asistencial será, por tanto, el único responsable de cualquier obligación, derecho, resultado, acción u omisión derivadas de la prestación de sus servicios y, en particular, del Servicio Asistencial, quedando eximido TRANSMURAL de cualquier tipo de reclamación al respecto.
CONDICIONES PARTICULARES COMPRA PAQUETE PRUEBAS
1. El Cliente sólo podrá realizar la compra del servicio si previamente tiene suscrito un contrato de prestación de servicio con Transmural.
2. Estas condiciones particulares, por tanto se añaden a las firmadas por el cliente.
3. El Cliente adquiere un paquete de pruebas que será activado en su cuenta de usuario para su consumo.
4. La activación del paquete se realizarán en los 5 días hábiles siguientes a la compra. No obstante esta demora en la activación no impedirá que el cliente pueda consumir las pruebas desde la plataforma de análisis siempre y cuando no tuviera desactivado el acceso a la misma previo a la compra.
5. Si no consume las pruebas contratadas dentro del Periodo de Validez, las mismas caducarán automáticamente y quedará sin efecto, por lo que el Cliente no tendrá derecho a ningún reembolso.
6. Al finalizar la compra, se enviará al correo electrónico del cliente un email con la confirmación de la compra en el cual se el periodo de validez del mismo servicio contratado en caso de existir.
7. Una vez consumido el paquete de pruebas o vencida la caducidad del mismo, el cliente volverá a la modalidad de pago por uso acordado en el Contrato de Prestación de Servicio, salvo que adquiera un nuevo paquete de imágenes.
CONDICIONES DE PRUEBA GRATUITA DE SERVICIO.
1. OBJETO DEL ACUERDO
Constituye el objeto del presente Acuerdo regular los términos y condiciones en los cuales Transmural permitirá al Cliente el acceso temporal (máximo treinta (30) días) y gratuito a los Servicios descritos a continuación, en condiciones de free-trial o prueba gratuita.
2. PRESTACIÓN DE LOS SERVICIOS
2.1 Los servicios ofrecidos por Transmural (en adelante, los “Servicios”) consisten en a realización de un test no invasivo, rápido y fácil de usar para la detección de glaucoma basado en el análisis automático de una imagen de fondo de ojo de la retina facilitada por el Cliente.
2.2 La prestación de los Servicios por parte de Transmural se configura como un modelo “SaaS” (Software as a Service), toda vez que Transmural pone a disposición del Cliente la plataforma informática accesible a través del sitio web www.quantusGL.org/platform (en adelante, la “Plataforma”), mediante la cual se prestan los Servicios, como un servicio bajo demanda que se utiliza de forma compartida con otros usuarios, y que se encuentra instalada en una infraestructura proporcionada por Transmural mediante Cloud Computing.
2.3 El Cliente accederá a la Plataforma a través de las claves de acceso que a tal efecto Transmural le asigne, y utilizará la misma siguiendo las indicaciones contenidas en el “Manual del Usuario” y en la “Guía de Adquisición de Imágenes”, material que se encuentra disponible en la propia Plataforma (donde estarán accesibles en todo momento en su versión más actualizada).
2.4 El Cliente permitirá el acceso a la Plataforma y los Servicios prestados a través de la misma únicamente a personal médico cualificado, garantizando el uso diligente y adecuado de los mismos, de conformidad con lo previsto en el presente Acuerdo y el Manual de Usuario ya referido.
2.5 El Cliente es el único responsable de la seguridad y confidencialidad de las claves de acceso a la Plataforma que se le asignen para disfrutar de los Servicios, eximiendo a Transmural de cualquier responsabilidad por accesos no autorizados a la Plataforma o a los Servicios.
3. PROPIEDAD INTELECTUAL E INDUSTRIAL
Transmural es el legítimo titular y conservará en todo momento la totalidad de los derechos de propiedad intelectual e industrial relacionados con los Servicios, así como los relativos a la Plataforma y el software utilizado para la prestación de los Servicios (incluyendo código fuente, textos, imágenes, marcas, logotipos, combinaciones de colores, así como su estructura, selección, ordenación y presentación) careciendo el Cliente de cualquiera de ellos.
3.2 La formalización del Acuerdo no implica, en ningún caso, la concesión de ningún derecho de propiedad intelectual o industrial relacionado con los Servicios, la Plataforma o el Software. No obstante lo anterior, a los efectos de permitir la prestación de los Servicios, Transmural concede al Cliente una licencia de uso temporal, revocable, no exclusiva, y no transferible sobre la Plataforma, sujeta a las condiciones establecidas en el presente Acuerdo.
3.3 Durante la vigencia del Acuerdo, el Cliente estará obligado a: (a) usar la Plataforma de forma diligente, correcta y lícita y, en particular, se compromete a abstenerse de suprimir, eludir o manipular el “copyright” y demás datos identificativos de los derechos de Transmural, así como los dispositivos técnicos de protección o cualesquiera mecanismos de información que pudieren incluirse en la Plataforma; y (b) no utilizar técnicas de ingeniería inversa, descompilar ni desensamblar la Plataforma;
3.4 Por su parte, el Cliente autoriza expresamente a Transmural para utilizar su nombre, imagen y logo en presentaciones que pueda realizar frente a terceros, en la web de Transmural, o en cualesquier otro material promocional que pueda elaborar, con la única finalidad de hacer referencia a la existencia de la relación objeto del Acuerdo y a la utilización del Software y/o la Plataforma por parte del Cliente.
4. PROTECCION DE DATOS DE CARÁCTER PERSONAL
4.1 La prestación de los Servicios implica que Transmural tenga acceso a datos de carácter personal incluidos en ficheros responsabilidad del Cliente, y a tal efecto se compromete a cumplir con las obligaciones que establece la normativa vigente en materia de protección de datos de carácter personal. En dicho sentido, y en relación al referido tratamiento de datos, Transmural se obliga:
i. A que el tratamiento se limite única y exclusivamente a aquél necesario para prestar los Servicios;
ii. A tratar los datos a los que tenga acceso conforme a las instrucciones del Cliente, no aplicándolos o utilizándolos con fines distintos a los establecidos en el Acuerdo, ni los comunicará, ni siquiera para su conservación, a ningún tercero sin la previa autorización del Cliente;
iii. A adoptar las medidas técnicas y organizativas necesarias que garanticen la seguridad e integridad de los datos de carácter personal objeto de tratamiento y que eviten un acceso no autorizado, habida cuenta del estado de la tecnología, la naturaleza de los datos almacenados y los riesgos a que están expuestos, ya provengan de la acción humana, del medio físico o natural, tal como éstas se encuentran recogidas en el Reglamento (UE) 2016/769 del Parlamento Europeo y del Consejo de 27 de abril de 2016 relativo a la protección de las personas físicas en lo que respecta al tratamiento de datos personales y a la libre circulación de estos datos y por el que se deroga la Directiva 95/46/CE (en adelante, Reglamento general de Protección de datos o RGPD);
iv. Una vez finalizado el Acuerdo, destruir o devolver al Cliente los datos objeto de tratamiento, a excepción de aquellos que deba conservar bloqueados como consecuencia de una previsión legal o en tanto pudieran derivarse responsabilidades de la relación de Transmural con el Cliente.
4.2 A los efectos de lo previsto en el Reglamento general de Protección de datos o RGPD, el Cliente autoriza expresamente a Transmural la subcontratación parcial de los Servicios, en particular la infraestructura virtual en la cual se encuentra ubicada la Plataforma, así como el tratamiento de datos personales que dicha subcontratación implica.
5. RÉGIMEN DE RESPONSABILIDAD
5.1 RÉGIMEN GENERAL. Los informes facilitados por Transmural al Cliente como consecuencia de la prestación de los Servicios indican un porcentaje de probabilidad de que el paciente a la que corresponden las imágenes de fondo de ojo presente glaucoma, calculado a partir de la información facilitada por el Cliente. En ningún caso dichos informes contienen un diagnóstico con una certeza del 100%. En consecuencia, los informes facilitados por Transmural no deben, en ningún caso, ser considerados como elemento de diagnóstico único para la toma de decisiones médicas por parte del Cliente. Por consiguiente, el Cliente exime a Transmural de toda responsabilidad que se derive de la toma de decisiones médicas por parte del Cliente, el personal dependiente de éste o los pacientes a quienes correspondan las imágenes facilitadas para la realización de los test objeto de los Servicios.
5.2 Los porcentajes de probabilidad que Transmural ofrece en sus informes pueden verse alterados en caso de que las imágenes de ultrasonido proporcionadas por el Cliente no cumplan estrictamente las condiciones establecidas en la “Guía de Adquisición de Imágenes” referida y disponible asimismo en la Plataforma.
5.3 Adicionalmente, y salvo que en el Acuerdo o en alguna disposición legal se imponga expresamente lo contrario, y exclusivamente en la medida y extensión en que así se imponga, Transmural responderá únicamente de los daños directos que pueda sufrir el Cliente como consecuencia directa de una anomalía en la prestación de los Servicios causada directamente por una acción u omisión de Transmural. En consecuencia, Transmural quedará exonerada de cualquier tipo de responsabilidad frente al Cliente, los clientes de éstos y cualquier tercero, por los daños que éstos puedan sufrir como consecuencia de acciones u omisiones imputables al Cliente, a sus usuarios, contratistas, representantes, cesionarios, empleados o personal que dependa de éste o se encuentre a su servicio, o cualesquiera terceros, así como de aquellas consecuencias directas o indirectas del mal uso o la manipulación indebida de la Plataforma por personal ajeno a Transmural. En cualquier caso, Transmural no será responsable de daños indirectos, pérdida de negocio, ingresos o beneficios, daño emergente, lucro cesante u oportunidades de negocio, de ahorro de gastos y de desaparición o deterioro de datos del Cliente.
5.4 Transmural no será en ningún caso responsable de: (a) los costes, multas, sanciones, indemnizaciones, cargos, daños u honorarios que se deriven del incumplimiento de sus obligaciones por parte del Cliente; (b) el contenido, uso y publicación de las informaciones y comunicaciones distribuidas a través de la Plataforma, así como el uso y los resultados obtenidos de los Servicios por el Cliente; (c) la violación del Cliente de cualquier norma que pudiera resultar aplicable a causas o en relación con la utilización de la Plataforma; (d) de ningún otro hecho que no le sea directo y exclusivamente imputable. El Cliente es y será el único responsable de: (a) el uso que realice de la Plataforma y de los informes resultantes de la prestación de los Servicios;(b) el cumplimiento íntegro de cualquier norma que pudiera resultar aplicable a causa o en relación con la utilización de la Plataforma; (c) recabar, en su caso, el consentimiento informado del paciente para la realización de la prueba ecográfica; (d) facilitar a Transmural información cierta y actualizada.
5.5 El Cliente es y será el único responsable de:(a)el uso que realice de la Plataforma y de los informes resultantes de la prestación de los Servicios;(b) el cumplimiento íntegro de cualquier norma que pudiera resultar aplicable a causa o en relación con la utilización de la Plataforma;(c)recabar, en su caso, el consentimiento informado del paciente para la realización de la prueba ecográfica; (d) facilitar a Transmural información cierta y actualizada.
5.6 Asimismo, Transmural no responderá frente al Cliente o cualquier tercero de cualquier tipo de pérdida de información o datos derivada del uso de la Plataforma; por la instalación de aplicaciones de terceros, virus informáticos, anomalías eléctricas; mal estado o averías de los sistemas informáticos utilizados por el Cliente, errores de sistema operativo; manipulación por personal no autorizado, causas de fuerza mayor; del retraso o fallos en el uso de la Plataforma; de cualquier otro caso que exceda más allá del control razonable de Transmural.
5.7 EXONERACIÓN. Transmural no será responsable de los problemas derivados de la falta de acceso o de los problemas inherentes a la conectividad a Internet o a las redes de electricidad cuando éstos tuvieran su origen en causas ajenas a su control o a causas que no hubieran podido ser previstas por las Partes, o que aun siendo previsibles Transmural haya realizado todos los esfuerzos razonables para evitarlas, o que fueran consideradas causas fortuitas o de fuerza mayor. Transmural no garantiza la infalibilidad y utilidad de los informes facilitados al Cliente a través de la Plataforma, declinando cualquier responsabilidad que de ello se pudiere derivar.
5.8 Sin perjuicio de las exoneraciones de responsabilidad acordadas en la presente condición, las Partes aceptan que cualquier indemnización que potencialmente se pudiera derivar del incumplimiento del Acuerdo deberá necesariamente moderarse teniendo como referencia, entre otros, los siguientes criterios: (a) la existencia de una relación razonable entre los niveles de garantías existentes y la ausencia de contraprestación alguna por los Servicios por parte del Cliente; (b) el estado de la técnica en cada momento y los usos y costumbres de las empresas que actúan en el sector; (c) el tipo y la naturaleza de los Servicios en relación con los riesgos inherentes a la actividad del Cliente; y (d) la toma por parte del Cliente de las precauciones necesarias para eliminar y/o en su caso minorar los daños sufridos.
6. LEY APLICABLE Y JURISDICCION
6.1 Las disposiciones del Acuerdo se regirán e interpretarán de conformidad con la legislación española.
6.2 Para la resolución de cualquier controversia que pudiera suscitarse en relación con la ejecución o interpretación del Acuerdo, y con renuncia expresa al fuero que pudiera corresponderles, las partes acuerdan someterse al fuero y jurisdicción de los Juzgados de la ciudad de Barcelona.
POLÍTICA DE PRIVACIDAD
¿Quién es el responsable del tratamiento de sus datos?
| Identidad: | Transmural Biotech, S.L. – CIF: B65084675 |
| Dirección postal: | Calle Juan Ignacio Luca de Tena 12, 28027 Madrid España |
| Correo electrónico: | info@transmuralbiotech.com |
| Contacto DPD: | dpo@transmuralbiotech.com |
¿Con qué finalidad tratamos sus datos personales?
La captura de la información se realizará a través de:
• Formularios de suscripción, que se encuentran en distintas partes de la web, y donde se le solicitará el nombre y el email. Los datos facilitados serán utilizados exclusivamente para enviar la Newsletter y mantenerlo actualizado sobre novedades y ofertas puntuales, exclusivas para suscriptores de transmuralbiotech.com. La lista de suscriptores será gestionada en MailChimp, ubicado fuera de la UE en EEUU y acogido al acuerdo EU-US Privacy Shield.
• Formulario de contacto, para consultas o sugerencias. En este caso se utilizará la dirección de correo electrónico para responder a las mismas y enviar la información que el usuario requiera a través de la web. Los datos facilitados estarán ubicados en los servidores de Dinahosting (proveedor de Transmural Biotech) ubicado dentro de la UE.
• Formulario de venta: El usuario dispone de diferentes formularios de compra sujetos a las condiciones de contratación especificadas para cada producto o servicio donde se le requerirán datos de contacto y de pago como: Nombre, apellidos, correo electrónico, teléfono y un identificador (este último solo será para la compra por parte de profesionales que ya cuentan con un contrato de prestación de servicios con Transmural Biotech). Los datos de pago serán recabados y gestionados por la pasarela de pagos utilizados por la web. Los datos facilitados estarán ubicados en los servidores de Dinahosting (proveedor de Transmural Biotech) ubicado dentro de la UE.
• Formulario de registro, que se encuentra disponible en el botón “Pruébanos” y donde se solicitará el nombre, email, país, hospital donde trabaja y número de teléfono para poder crearle una cuenta de usuario para tener acceso al producto del que se desea realizar una prueba gratuita. Este formulario se encuentra sujeto a las condiciones de contratación especificadas para cada producto o servicio. Los datos facilitados estarán ubicados en los servidores de Dinahosting (proveedor de Transmural Biotech) ubicado dentro de la UE.
¿Durante cuánto tiempo conservaremos sus datos?
• Datos del correo de Contacto: Un máximo de 5 años conforme al Artículo 1.964 del Código Civil (plazo de prescripción de las acciones personales).
• Datos de contactos comerciales: Durante el periodo necesario para mantener las relaciones comerciales y una vez terminadas o ejercido el derecho de supresión por el interesado un máximo de 5 años conforme al Artículo 1.964 del Código Civil (plazo de prescripción de las acciones personales).
• Datos con fines promocionales: Se conservarán hasta que no se solicite su supresión por el interesado.
¿Cuál es la legitimación para el tratamiento de sus datos?
Los datos personales se recabarán y serán tratados exclusivamente con las siguientes finalidades que se describen a continuación, las cuales se fundamentan en las siguientes bases legales:
• En el caso de que haya suscrito un contrato de prestación de servicios con Transmural Biotech, la base legal para el tratamiento de sus datos será la ejecución del mismo según los términos y condiciones que constan en el mismo. La oferta prospectiva de productos y servicios está basada en el consentimiento que se le solicita, sin que en ningún caso la retirada de este consentimiento condicione la ejecución del contrato de suscripción.
• En el caso de haber ofrecido la información a través de alguno de los formularios que se encuentran en la web (salvo el relacionado con el formulario de registro), la base legal para el tratamiento de sus datos será su consentimiento.
• Se podrá comunicar información a autoridades públicas, reguladores u órganos gubernamentales en aquellos supuestos en que es necesario hacerlo por ley, normativa local o en el cumplimiento de obligaciones regulatorias en base al cumplimiento de una obligación legal.
Los datos que se solicitan a través de la web son obligatorios, ya que son necesarios para la prestación de un servicio óptimo. En caso de que no sean facilitados todos los datos, no se puede garantizar que la información y servicios facilitados se ajusten a sus necesidades.
¿A qué destinatarios se comunicarán sus datos?
En los términos descritos en la sección. ¿Cuál es la legitimación para el tratamiento de sus datos?, Transmural Biotech podrá comunicar sus datos personales a Autoridades públicas, reguladores u órganos gubernamentales o jurisdiccionales en aquellos supuestos en que es necesario hacerlo por ley, normativa local o en el cumplimiento de obligaciones regulatorias.
Aunque no implican cesiones de datos, para las diferentes actuaciones relativas a los tratamientos, Transmural Biotech tiene contratados diferentes proveedores para que presten determinados servicios, y que pueden necesitar acceder a su información. No obstante, estos proveedores gestionan los datos con el único objetivo de prestarnos el servicio contratado, siguiendo nuestras instrucciones y sin que puedan destinarlos para ninguna otra finalidad.
En concreto, Transmural Biotech contratará la prestación de servicios por parte de terceros proveedores que desempeñan su actividad, a título enunciativo y no limitativo, en los siguientes sectores: asesoramiento jurídico, empresas de servicios profesionales, empresas proveedoras de servicios tecnológicos, empresas proveedoras de servicios informáticos, prestadores de servicios de mensajería instantánea.
Transmural Biotech sigue unos criterios estrictos de selección de proveedores de servicios con el fin de dar cumplimiento a sus obligaciones en materia de protección de datos y se compromete a suscribir con ellos el correspondiente contrato de tratamiento de datos mediante el que les impondrá, entre otras, las siguientes obligaciones: aplicar medidas técnicas y organizativas apropiadas; tratar los datos personales para las finalidades pactadas y atendiendo únicamente a las instrucciones documentadas de Transmural Biotech; y suprimir o devolver los datos una vez finalice la prestación de los servicios.
¿Cuáles son sus derechos cuando nos facilita sus datos?
Usted tiene derecho a obtener información sobre si en Transmural Biotech SL estamos tratando sus datos personales, por lo que puede ejercer sus derechos de acceso, rectificación, supresión y portabilidad de datos y oposición y limitación a su tratamiento ante Transmural Biotech SL, en la dirección de correo electrónico dpo@transmuralbiotech.com, adjuntando copia de su DNI o documento equivalente.
Asimismo, y especialmente si considera que no ha obtenido satisfacción plena en el ejercicio de sus derechos, podrá presentar una reclamación ante la autoridad nacional de control dirigiéndose a estos efectos a la Agencia Española de Protección de Datos, C/ Jorge Juan, 6 – 28001 Madrid.
INFORMACIÓN REGLAMENTARIA

quantusGL
quantusGL ha sido desarrollado por la empresa Transmural Biotech S.L. que está especializada en el desarrollo de tecnologías médicas basadas en técnicas de procesado de imagen.
 Transmural Biotech S.L. Juan Ignacio Luca de Tena 12, 28027 Madrid, España.